Maintaining a trumpet’s prime condition requires consistent upkeep and careful routine cleaning.
Neglecting this instrumental maintenance risks compromise in the sound quality and overall performance of this beloved brass.
Hence, a dependable strategy for cleaning is of prime importance for all trumpet players – be it professionals or novices.
This article provides practical, step-by-step guidance to aid you in this careful maintenance.
Efficiency, time management, simplicity, and effectivity are essential components of this process.
Equip yourself with the necessary skills to extend the life of your trumpet, enhance its performance and maintain it in top-notch condition.
Contents
- How Do You Clean A Trumpet?
- Step-by-Step Guide to Cleaning a Trumpet
- How Often Should You Clean Your Trumpet?
- The Importance of Regular Trumpet Cleaning
- Choosing the Right Cleaning Tools for Your Trumpet
- How to Properly Disassemble a Trumpet for Cleaning
- Homemade Solutions for Cleaning Your Trumpet
- What to Avoid When Cleaning a Trumpet
- Understanding When to Use Valve Oil and Slide Grease
- How to Reassemble Your Trumpet After Cleaning
- Tips for Maintaining Your Trumpet’s Prime Condition Post-Cleaning
- The Bottom Line
How Do You Clean A Trumpet?
To clean a trumpet, first disassemble the instrument carefully and soak the pieces in warm soapy water for approximately 15 minutes. After soaking, scrub the insides of each piece using snake brushes and a mouthpiece brush, then rinse thoroughly with clean, warm water. Lastly, thoroughly dry the pieces before reassembling the trumpet, applying valve oil and slide grease as needed.
In addition to these fundamental cleaning procedures, it’s crucial to delve deeper into the intricacies of trumpet maintenance.
Our discussion extends beyond basic cleaning, addressing the importance of regular care, the potential risks of neglecting such routine practices, helpful tips to make this task easier, as well as how to troubleshoot and rectify common problems that may occur over time.
Every aspect is designed to ensure your trumpet stays in optimal condition for superb performance.
Step-by-Step Guide to Cleaning a Trumpet
Keeping a trumpet clean is essential for its optimal performance. It ensures the instrument not only looks sprucing but also sounds best, thus allowing you to create beautiful music.
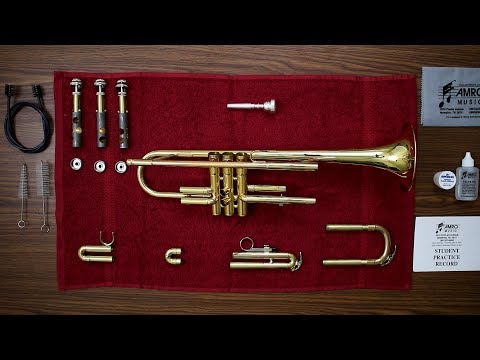
Step One: Gather Your Cleaning Supplies
Before you start the cleaning process, it is paramount to have appropriate cleaning tools. These tools include a trumpet cleaning kit that generally consists of a mouthpiece brush, a valve casing brush, a flexible bore cleaning brush, polishing cloth, valve oil, and slide grease.
Also, include a tub large enough to hold the disassembled trumpet parts, mild detergent or soap, and soft, lint-free cloths.
A trumpet cleaning kit is the most crucial equipment in maintaining your trumpet’s cleanliness and overall health.
Having the right cleaning utilities to hand ensures you can thoroughly clean your trumpet, effectively reducing potential damage risks when using unsuitable or makeshift cleaning supplies.
Step Two: Disassembling the Trumpet
Getting to the insides of the trumpet for cleaning necessitates detaching the different parts of the instrument. Remove the mouthpiece, valves, and slides gently to avoid any damage. Remember the order in which you removed each part to make it easy to reassemble.

The video above provides an in-depth guide on how to properly disassemble your trumpet for cleaning. You will also learn the common mistakes to avoid during this process which might harm your instrument.
Step Three: Soaking the Trumpet
Next comes soaking the trumpet parts. Fill your tub with lukewarm water and mild soap. Place the disassembled parts in the tub and let them soak for about 15-20 minutes.
Soaking helps to loosen the dirt, grim, and oil accumulated inside the trumpet, making it easier for you to remove them.
This method of soaking not only enhances the cleaning process but also minimizes potential risks of scratching or denting the trumpet parts during cleaning.
Step Four: Scrubbing the Trumpet
Using the brushes from your cleaning kit, carefully scrub the insides of your trumpet parts. Ensure not to force the brushes into place to avoid damaging the instrument.
Each part will require a different brush. For instance, the flexible bore brush should clean the main tunings slides, bell, and lead pipe. The valve casing brush should clean the valve casings, and the mouthpiece brush should clean the mouthpiece.
Step Five: Rinsing and Drying
Once you’ve thoroughly scrubbed every part, rinse them under warm running water to remove the soapy water completely. Use a clean, lint-free cloth to dry all the parts properly.
It’s essential to dry the trumpet parts thoroughly to avoid water spots or potential damage due to moisture.
Avoid using hot air dryers or heaters to dry the instrument as this could lead to discoloration or other heat-related damages.
Step Six: Applying the Valve Oil and Slide Grease
After ensuring every part is dry, it’s time to apply the valve oil for the valves and slide grease for the slides. These substances ensure that your trumpet’s movable parts function smoothly and without friction.
Remember, care is needed while lubricating to avoid overapplication that can attract more dirt and affect the performance of the trumpet.
Step Seven: Reassembling the Trumpet
The final step involves carefully reassembling the trumpet parts, ensuring that each one is in its right position. A general rule is to apply gentle pressure and avoid forcing any component into place.
Now you’re all set with a clean, fully functional trumpet ready for your next practice or performance.
Keeping your trumpet clean is a vital part of its maintenance regime and will significantly improve your instrument’s longevity and performance.
How Often Should You Clean Your Trumpet?
Ensuring that your trumpet is well-maintained not only improves the instrument’s performance, but also extends its lifespan in general. One fundamental aspect of maintaining your trumpet is understanding how often it should be cleaned.
Determining Cleaning Frequency
As there’s no one-size-fits-all answer to this, the frequency of your trumpet cleaning should be determined by several factors.
The first of these is how often you use your instrument. A professional musician who plays on a daily basis may need to clean their trumpet more regularly than a student who only practices a couple of times a week.
Regular cleaning helps to remove the buildup of dirt, dust, and oils that can accumulate inside your trumpet, and which can eventually lead to a decline in the quality of the sound it produces.
Typically, professionals suggest a thorough cleaning of your trumpet once every one to two weeks if you play regularly.Giving your trumpet a comprehensive cleaning every week or two will ensure it stays in peak condition, providing a consistent, quality sound.
In addition, cleaning your trumpet’s mouthpiece should be performed more often, maybe even after each use, due to the increased exposure to saliva and other germs from your mouth.
The Role of Environment in Cleaning
Another important factor affecting how often you should clean your trumpet is your environment.
For instance, if you’re playing in a relatively clean, dust-free environment, your trumpet may not require as frequent cleaning. However, if your surroundings are dusty or dirty, this could lead to quicker accumulation of grunge inside your trumpet, thus necessitating more routine cleaning.
On top of this, the location’s humidity can play a role in rust buildup inside the trumpet. Humid conditions are more likely to result in rust, which could damage the inner components of the instrument.
If you’re living in a region with high humidity, consider cleaning your trumpet more frequently to prevent rust and other types of damage.This is particularly crucial for those using their instrument professionally or frequently, as even small variations in inner surface quality can result in noticeable sound alterations.
Visual and Auditory Indicators
Lastly, how often you should clean your trumpet may also be determined by visual and auditory indicators.
If the trumpet begins to look dirty or tarnished, or if it’s not producing as clear a sound as it should, these could be signs that a thorough cleaning is needed.
Small particles or dirt inside the trumpet can create a barrier to the flow of air and obstruct the vibration that creates the instrument’s sound. These unnoticed issues can culminate in big problems if not addressed promptly.
However, even if you don’t notice these signs, it’s still crucial to adhere to a consistent cleaning schedule to keep your trumpet in top condition. Many issues are not immediately apparent, and routine maintenance can catch problems before they develop into something more serious.
In conclusion, cleaning frequency varies from person to person, but a good rule of thumb is to clean your trumpet thoroughly every one to two weeks if in constant use, and more often if circumstances require it.
The Importance of Regular Trumpet Cleaning
When it comes to maintaining the performance and longevity of your trumpet, regular cleaning is paramount.
Yet many instrumentalists underestimate its importance or remain uncertain about the correct cleaning procedures.
Enhances Sound Quality
Clean trumpets perform significantly better and sound noticeably clearer.
Dirt and debris can accumulate over time in the trumpet’s various tubes and valves, leading to sound distortion and reduced airflow.
This can significantly impede your ability to produce clear and pitch-perfect tones.
Regular cleaning, therefore, is not an optional task but a necessity for every passionate trumpet player.
A clean trumpet is a good-sounding trumpet; it’s as simple as that.
This maxim rings particularly true for trumpets due to their design and the nature of the music they produce.
A well-maintained trumpet not only guarantees clear sound but also helps in boosting the player’s confidence.
Preserves Trumpet’s Lifespan
Another major reason why regular cleaning is essential is it extends the lifespan of the trumpet.
When grime and dirt accumulate, they can cause irreversible damage to the instrument’s interior components such as valves and tuning slides.
Over time, these can cause corrosion leading to decreased functionality and in severe cases, complete instrument failure.
By cleaning your trumpet regularly, you prevent the build-up of harmful substances, thereby ensuring that your instrument is always in great working condition.
Think of your trumpet as an investment; regular cleaning significantly prevents wear and tear, preserving the instrument’s structural integrity and aesthetic appeal.
That’s why it’s important to consider consistency and quality in your cleaning habits to get the most out of your instrument and maintain its value.
Still unsure about how to do a proper clean? You might find this video helpful.
It offers practical visual guidance for performing a comprehensive trumpet cleaning to ensure lasting performance and sound quality.
Fosters Good Hygiene
Last but not least, regular trumpet cleaning ensures good hygiene.
Every time you play the trumpet, a certain amount of moisture and saliva inevitably enters the instrument.
These, combined with dust and dirt, can foster a conducive environment for the growth of bacteria and mold.
Thus, without regular cleaning, your beloved instrument could turn into a breeding ground for germs, posing health risks to the player.
Regular maintenance helps to sanitize your trumpet, ensuring a safer and healthier experience every time you play.
Remember, playing a clean trumpet is not just about the sound; it’s about protecting your health too.
Taking the time to clean your trumpet not only shows commitment to your craft but is an essential aspect of personal hygiene and self-care.
When using this guide, remember consistency is key. Regular cleaning habits will ensure you are always playing a pristine, hygienic, and optimally functioning instrument.Choosing the Right Cleaning Tools for Your Trumpet
When it comes to taking good care of your trumpet, selecting the right cleaning tools is crucial.
Not every cleaner or tool available on the market is appropriate, and some can even cause damage to your trumpet.
Understanding Trumpet Construction Material
The first step towards selecting the right cleaning tools is understanding the construction material of your trumpet.
Most trumpets are made from brass, a relatively soft metal that can easily be scratched or dented.
Therefore, using hard or metallic cleaning tools can potentially lead to damage over time.
Additionally, certain types of cleaners, particularly those that are acidic, can cause discoloration or pitting of the brass.
For this reason, it is recommended to use plastic or soft cloth materials for cleaning the outside and inside of your trumpet.
Understanding the construction material of your trumpet is crucial in selecting the right cleaning tools, to avoid any potential damage.
This understanding not only guides in tool selection, but also aids in determining the right cleaning solutions to use.
Clearly, consideration for the trumpets make and material comes first in choosing a safe and effective tool for its upkeep.
Choosing Correct Cleaning Tools
When it comes to the actual cleaning process, there are several tools specifically designed for trumpet maintenance.
Snake brushes are recommended for cleaning the inside of the trumpet while valve casing brushes are great for cleaning the valve casings.Mouthpiece brushes clean the mouthpiece and are crucial since it is in direct contact with the user, hence must be kept extremely clean at all times.
For removing dust and dirt from the exterior of the trumpet and its complex mechanisms, soft cloth materials can do a fine job without causing any harm.
This tool selection helps to alleviate the risk of any dirt or debris that can alter or affect the sound quality of the trumpet.
Snake brushes, valve casing brushes, and mouthpiece brushes are essential tools when cleaning your trumpet.
These tools not only ensure thorough cleaning, but also safeguard the integrity of your instrument.
They are specialized to work on each specific part of the trumpet without causing any damage.
Therefore, these are wise investments for any trumpet player, amateur or professional.
Ensuring the Quality of Your Tools
Lastly, it is equally important to ensure the quality of your cleaning tools.
Ensure that they are made of materials that do not wear out quickly, or worse, wear out and leave debris within your trumpet.
Inferior quality tools may save you a few bucks initially, but they can lead to costly repairs in the long run.
Luckily, most reputable music stores will have high-quality cleaning kits specifically made for trumpets.
The bit of extra cost for higher-quality tools will pay for itself in the long run through the extended lifespan of your trumpet.
Ensuring the quality of your cleaning tools is crucial in maintaining the longevity of your trumpet.
High-quality tools serve to protect your instrument, ensuring it can provide the best possible sound quality for the longest possible time.
With high-quality tools at hand, you can engage in effective routine cleanups, promoting the overall health and longevity of your trumpet.
How to Properly Disassemble a Trumpet for Cleaning
When it comes to cleaning your trumpet, the first and most crucial step is proper disassembly. This process, when done carefully and correctly, preserves the functionality and lifespan of your trumpet.
It’s worth noting that the trumpet is a precisely crafted instrument. Each section plays a vital role in producing its distinctive sound. Therefore, understanding how to dismantle it the right way prevents damage.

By watching the video, you will get a visual guide on safely taking apart your trumpet, and you will understand why it’s important to follow the right disassembly steps.
Step 1: Handle with Care
The first thing to remember when disassembling your trumpet is to handle it with utmost care. This instrument consists of delicate parts that can dent or break easily if handled roughly.
Make sure to place a soft cloth on the surface where you’ll be working to provide cushioning for the trumpet parts. This minimizes the risk of scratches or dents.
Remember, your trumpet is made of brass which is a soft metal and is prone to damage if mishandled.
It’s also crucial you follow the correct order of disassembly to prevent undue strain on certain parts. Incorrect disassembly leads to unnecessary wear and can cause mechanical issues.
Step 2: Unscrewing the Parts
Start by unscrewing the mouthpiece from the lead pipe. In some cases, the mouthpiece may be stuck, and forcing it out might damage your trumpet. Therefore, you have to be gentle and use a mouthpiece puller if needed.
Next, turn the trumpet around and start to carefully unscrew the valve buttons. Lift each valve straight out of its casing, being careful not to rotate them as you do so. It’s essential to note that valves have a specific order, and it should be retained during cleaning and reassembly. To ensure you remember the correct order, place them in a row in the order they were removed.
Never force a valve out of its casing. If you encounter resistance, check that you have unscrewed it fully before trying to lift it out.
Lastly, remove the slides. Every slide must be pulled straight out, similar to how the valves were. Ensure that you lay each slide out in the order they were removed for proper reassembly.
In conclusion, disassembling your trumpet for cleaning may initially seem like a daunting task. However, with understanding the correct steps and a lot of care, it is a task that becomes second nature over time. Regular maintenance and cleaning of your trumpet will not only ensure a beautiful, clean tone every time you play but also extend the lifetime of your instrument. Remember, it all begins with proper disassembly.Homemade Solutions for Cleaning Your Trumpet
Before jumping into the heart of this chapter, you should first understand the importance and benefits of homemade cleaning solutions.
These options are not only economical, they also reduce the risk of damage that can come from harsh chemical cleaners.
While these alternatives can be effective, they should be used carefully and properly to avoid spoiling the trumpet’s finish and integrity.
Soap and Water
Easily the most accessible cleaning solution is a mixture of warm water and mild soap.
Care must be taken to ensure the water is not too hot as it can harm the lacquer finish of the trumpet.
Non-abrasive, unscented soap can help in loosening and eliminating grime without risking any damage to the instrument.
After the cleaning, remember to dry all components before reassembling to avoid any water damage.
The occasional use of a mild soap and water mixture can go a long way in keeping your trumpet clean and sounding its best.
A mild soap and warm water solution remains the safest and most accessible option for cleaning a trumpet at home.
It is a quick and simple method that can regularly be employed before and after every few uses.
This helps in the gradual breakdown of stubborn residues that could affect the performance and longevity of your trumpet.
Vinegar and Salt
For a deeper clean, especially for those neglected sections and parts, a mixture of white vinegar and salt can be highly effective.
Together, these ingredients can work as a high-powered brass cleaner that is tough on grime but gentle on the finish.
To use, you will want to dissolve 1 part salt in 9 parts vinegar, soak the trumpet parts for a while, and then rinse with warm water.
It’s absolutely important to rinse the trumpet thoroughly after cleaning this way because leftover vinegar can cause unwanted damage.
Vinegar and salt, mixed in the right proportion, can provide a powerful yet safe homemade cleaning solution for your trumpet.
However, you have to be cautious during application to ensure you don’t leave the instrument soaked for too long.
Also, a thorough rinse is necessary to remove all the vinegar traces which could cause harm if left unchecked.
Always remember that the effectiveness of a cleaning solution largely depends on application methods and post-cleaning care.
What to Avoid When Cleaning a Trumpet
An integral part of maintaining a trumpet’s lifespan and performance, is understanding what to avoid during the trumpet cleaning process.
Avoiding Harsh Chemicals
Cleaning your trumpet and its parts with harsh chemicals can potentially cause damage.
Many believe that using strong substances will yield better results, however, that is not the case with trumpets.
It can strip off the lacquer finish and even cause pitting on its surface.
The metals that trumpets are made from are sensitive and should not be exposed to harsh substances.
Opt for mild soaps or homemade cleaning solutions to keep your instrument safe and clean.
> It can strip off the lacquer finish and even cause pitting on its surface.This damage is irreversible and can affect the sound quality the trumpet produces
It is therefore important to be mindful of the cleaning agents used.
Only use cleaning solutions that are made specifically for musical instruments or a mild homemade solution.
Avoiding Forceful Handling
The parts of a trumpet are delicate and should be handled with care.
Forceful handling could result in bent or broken parts which can impact the overall functionality of your trumpet.
> The parts of a trumpet are delicate and should be handled with care.Good handling goes hand in hand with the flawless performance of the instrument.
You should take particular caution when disassembling and reassembling the trumpet for cleaning.
Avoiding Infrequent Cleaning
Another common mistake is not cleaning your trumpet regularly enough.
Avoiding infrequent cleaning is essential as it can lead to buildups which can affect the sound quality of your trumpet.
> Another common mistake is not cleaning your trumpet regularly enough.You should endeavor to keep up with regular cleaning sessions for the longevity of your trumpet.
Regular cleaning also ensures the production of good, quality sound every time you play.

By watching the embedded video, you can learn the proper techniques of cleaning and maintaining your trumpet.
Also, the video can give you an idea about some common problems and solutions while handling the instrument and more about what not to do during the process.
Understanding When to Use Valve Oil and Slide Grease
The care and maintenance of a trumpet require understanding of how different substances can enhance the instrument’s performance and increase its longevity.
Two such essential substances are valve oil and slide grease, both of which have their own unique applications and benefits.
The Necessity of Valve Oil
When it comes to the operation of your trumpet’s valves, valve oil is indispensable.
The primary function of this liquid is to reduce friction between the internal components of the valve, facilitating smoother, quicker action.
Moreover, it prevents any potential of damage or wear and tear that may otherwise occur due to constant contact between the metallic parts.
Using valve oil frequently can therefore both maintain a high level of performance and prolong the life of your trumpet.
The primary function of valve oil is to reduce friction between the internal components of the valve, facilitating smoother, quicker action.
This is not an aspect to overlook if you want your instrument to continue delivering excellent sound quality and maintain its mechanism in the best possible shape.
The exact frequency of application can vary based on how often you play, but a general rule of thumb is to apply valve oil once a week or whenever the valves start to feel sluggish.
The Role of Slide Grease
On the other hand, slide grease has a very different but equally crucial role in ensuring optimal functioning of your trumpet.
It is specifically designed for use on the slides of the instrument, providing lubrication that makes them easier to adjust.
And much like how valve oil protects against damage, slide grease also protects the metal surfaces of the slides from corrosion and wear.
Therefore, applying slide grease frequently can sustain the ease of tuning your trumpet and extend its lifespan.
Slide grease is specifically designed for use on the slides of the trumpet, providing lubrication that makes them easier to adjust.
Again, the frequency of application depends on how often you play and the specific type of grease you use, but an approximate guideline is to apply it every month.
However, do monitor the slides, and if they begin to feel stiff or hard to move, apply some slide grease immediately.
Applying Valve Oil and Slide Grease
The processes for applying valve oil and slide grease are quite simple, but require deliberate and careful action.
For valve oil, remove the valve from its casing, apply a few drops of oil onto the valve, and then reinsert the valve, ensuring it is placed back in the correct orientation.
With slide grease, take out the slide, wipe off any old grease, apply a small amount of the new grease, and then reinsert the slide into its socket.
You should always ensure that the valve or slide is completely dry before applying the respective substance to avoid any mixture with moisture.
With the right care, your trumpet can perform excellently and last for many years.
How to Reassemble Your Trumpet After Cleaning
Reassembling your trumpet after a thorough cleaning process is a crucial step in ensuring optimal performance.
Step 1: Air Dry all the Parts
Begin the reassembly process by air drying all your trumpet parts. Once your trumpet components are cleaned, rinsed and wiped down, they need to be totally air-dried before the reassembly process kicks off.
This is to ensure that no moisture is trapped within the trumpet as it can lead to undesirable results.
Make sure that all pieces are thoroughly dry before proceeding to the next step.
>Once your trumpet components are cleaned, rinsed and wiped down, they need to be totally air-dried before the reassembly process kicks off.
You should avoid using any form of heated object to accelerate the drying process as this can cause damage to the materials. Instead let them naturally dry in an open space that is away from the sun.
Step 2: Reinstall the Valves and Slides
The second step involves reinstalling the valves and the slides. Ensure that each valve is reinstalled in its appropriate casing, and note that each valve usually has a number to indicate its position.
Make sure that each valve is installed in the right direction too.
When replacing the slides, make sure they fit well into the trumpet body.
>Ensure that each valve is reinstalled in its appropriate casing, and note that each valve usually has a number to indicate its position.
Do not force the slides into position; they should easily slide into place. If any resistance is felt during this process, it indicates there’s still some dirt or debris left, requiring another round of cleaning.
Step 3: Lubricate Your Trumpet Properly
Finally, the whole reassembly process is not complete without properly lubricating your trumpet.
This is an important step to ensure that your valves and slides move smoothly. You should use valve oil for the valves and slide grease for the slides.

This video provides a step-by-step visual aid for reassembling a trumpet after cleaning.
Understanding these instructions and following them can make the maintenance process easier and more efficient.
Check the Trumpet’s Functionality
After reassembly, check the functionality of your trumpet to see whether everything is working smoothly.
Play a few notes to test the sound and ease of operation. If everything seems to be in order, enjoy playing your clean, well-maintained trumpet.
In the event of malfunctions or persisting issues, seek expert assistance.
>Play a few notes to test the sound and ease of operation. If everything seems to be in order, enjoy playing your clean, well-maintained trumpet.
It’s better to address these issues early before severe damage occurs. Always aspire to keep your trumpet in good condition for the best possible performance.
Tips for Maintaining Your Trumpet’s Prime Condition Post-Cleaning
Proper Storage of Your Trumpet
After cleaning, it’s essential always to store your trumpet in a dry and clean place.
This will prevent dust accumulation, which could clog the valves or slides, and humidity, which could lead to rust or corrosion.
The ideal storage solution would be a hard case that fully encloses and cushions the trumpet.
It’s not recommended to leave your trumpet out on a stand for extended periods, especially in exposed or high traffic areas.
This leaves the trumpet susceptible to accidents, dust build-up, and changes in temperature and humidity.
Regular Inspection and Care
Performing regular visual and tactile inspections of your trumpet is a great proactive measure to ensure that it stays in top condition.
You should look for signs of wear, discoloration, or corrosion, and feel for loose parts or damage.
Damage to a trumpet can sometimes be subtle until it becomes serious, so regular inspection can help you catch problems early.
Additionally, it’s good practice to wipe down your trumpet with a clean, dry cloth after each use.
Removing any moisture, oils, or residue will help maintain the finish of your trumpet and keep it looking clean and shiny.
This habitual care might seem minor, but it does a great deal in maintaining your instrument’s prime condition.
It’s part of the discipline expected from a dedicated and serious musician.
The Need for Periodic Cleaning
Even with regular wiping and inspections, your trumpet will still need periodic deep cleaning to maintain optimal performance and prolong its lifespan.
This is due to unavoidable build-up of residue in the bore, valves, and slides where cloth can’t reach.
A good rule is to deep clean your trumpet every three months or so, though heavy users may need to do so monthly.
Always follow the manufacturer’s cleaning instructions or consult with a professional if you’re uncertain.
Remember, using the wrong cleaning solutions or procedures could potentially harm your instrument.
Proper Reassembling and Lubrication
Proper reassembling and lubrication of your trumpet after cleaning is crucial to its performance and longevity.
Improper assembly can cause damage, while inadequate lubrication can lead to friction and wear.
Always apply valve oil to the pistons to ensure smooth and noise-free operation, and use slide grease on the slides to ensure they move freely and seal properly.
Moreover, improper reassembly can result in ill-fitting components and hinder the overall sound quality of your trumpet.
It’s critical to ensure everything is correctly fitted and placed to maintain the instrument’s prime condition.
Throughout your trumpet maintenance journey, always remember careful maintenance and proper cleaning are the keys to keeping your trumpet in its prime condition. Not only will these habits extend the life of your trumpet, but they will also inevitably contribute to your ability to produce the best sound technically possible from your instrument.The Bottom Line
Maintaining your trumpet’s prime condition isn’t just about making it appear new or shiny, it’s a necessity for ensuring your instrument performs at its best and serves you for a long time.
Frequent cleaning, using the right tools and homemade solutions can significantly help in achieving this, with careful disassembly and reassembly being crucial steps.
Furthermore, strategic use of valve oil and slide grease can improve performance but knowing what to avoid when cleaning is equally important.
Through the comprehensive guide provided above, you should have a better understanding of trumpet maintenance – an indispensable aspect for every trumpeter aiming to create enchanting music!