A well-maintained trumpet doesn’t just produce a fantastic sound but also lasts longer.
It’s an instrument that brings joy to the ears when played correctly, but when it comes to cleaning and maintenance, some users may stumble.
Yet, this task doesn’t have to be daunting or complicated.
Understanding the basics of trumpet hygiene is important for every player and enthusiast.
This article intends to explain, in simple terms, the procedural steps for cleaning your trumpet effectively and safely.
Let’s delve into these straightforward guidelines and keep your trumpet in great condition.
Contents
- How To Clean A Trumpet?
- Step by Step Guide to Cleaning a Trumpet
- The Importance of Regularly Cleaning Your Trumpet
- The Right Tools for the Cleaning Job
- What Happens If You Don’t Clean Your Trumpet Regularly?
- Instructions for Disassembling Your Trumpet
- How to Properly Soak and Clean Trumpet Parts
- Is It Safe to Use Regular Dish Soap for Trumpet Cleaning?
- Tips for Reassembling Your Trumpet
- The Right Way to Oil Trumpet Valves and Slides
- Buffing the Exterior: The Finishing Touch to Trumpet Care
- The Bottom Line
How To Clean A Trumpet?
Cleaning a trumpet involves disassembling the instrument, then soaking the different parts in warm soapy water. After soaking, each part must be cleaned using a specific trumpet cleaning kit and dried thoroughly. Reassemble the instrument carefully, oil the valves and slides, and buff the exterior to finish the process.
Continuing with this comprehensive guide, we delve into specific techniques to ensure enhanced longevity and performance of your trumpet.
From the importance of regular maintenance schedules, best practices for valve oil application, to addressing common cleaning mistakes, we aim to equip you with a solid understanding of trumpet upkeep.
Therefore, it’s indeed worth your time to explore these pertinent care nuances if you want the extra edge in preserving the vitality of your musical instrument.
In addition, we touch on some professional advice on preventive care, underscoring how to minimize potential damages from everyday use.
Step by Step Guide to Cleaning a Trumpet
Being a trumpet player requires more than just the capability to play melodic tunes. It also involves maintaining the instrument’s cleanliness and functionality.
Regular cleaning of a trumpet is an essential routine that every player must undertake. Not only does it contribute to the creation of pristine and high-quality sound, but it also enhances the instrument’s longevity.
The responsibility of ensuring the trumpet’s cleanliness, however, can be daunting, especially to new beginners who have little to no knowledge about the proper cleaning ways. In this article, we provide a step-by-step guide to help you clean your trumpet and ensure it works to its full potential.
Importance of Cleaning Your Trumpet
Cleanliness plays an essential part in maintaining a trumpet’s quality.
Cleaning the trumpet regularly removes the accumulated dirt, dust, and oil, which if left unattended, can build up and damage the trumpet.
Not only does it increase the lifespan of the instrument, but it also enhances the quality of the sound produced. A clean trumpet produces a finer, more precise sound output.
The Right Tools
You require specific cleaning tools for a thorough trumpet cleaning process.
These tools include a snake brush, mouthpiece brush, valve casing brush, valve oil, and slide grease. It may also help to have a polishing cloth to buff the exterior of the trumpet after cleaning.
Acquiring these tools ensures a safe and efficient cleaning procedure, eliminating the risk of damage to the trumpet parts during the cleaning process.
Cleaning Instructions
First, disassemble your trumpet carefully. Each part needs to be detached gently to avoid damage.
For more guidance on how to disassemble your trumpet safely, consider watching the following instructional video.
In the video, you will find a detailed yet easy-to-follow guide on how to disassemble and clean your trumpet effectively. In addition, the video also offers great tips on how to prevent any damage to your trumpet during the disassembly process.
Once disassembled, properly soak and clean each part. Regular dish soap and warm water can do the trick. However, there are also specialized cleaning solutions available in the market specifically intended for brass instruments like trumpets.
Thoroughly cleaning each part of the trumpet ensures that the build-up of dirt and grime is completely removed.
This significantly enhances the overall functionality of your trumpet, allowing for smoother operation and a better sound.
After cleaning, carefully reassemble the trumpet, taking note to oil the valves and slides correctly. This ensures a smooth reassembly and avoids any future difficulties in the trumpet’s operation.
Buffing the Trumpet: The Finishing Touch
The final step to cleaning your trumpet is buffing the exterior. A soft cloth should be used to gently rub the surface of the instrument after cleaning, this helps bring out the original shine of the brass material.
The process of buffing does not only make the trumpet look aesthetically pleasing, but it also adds a protective layer to the exterior of the instrument.
Overall, cleaning a trumpet does not have to be a daunting and complicated task. As long as you have the right tools and the knowledge of the correct cleaning procedures, you can effectively clean your trumpet, maintain its quality, and enjoy playing your instrument for a long time to come.
The Importance of Regularly Cleaning Your Trumpet
**Regular cleaning of your trumpet** is not just about maintaining its shiny allure, but also about safeguarding the instrument’s functionality and extending its lifespan.
Musical instruments, especially brass ones like trumpets, are vulnerable to damage from the very air we breathe.
When you play, moisture from your breath combines with oils from your skin, creating a corrosive concoction inside your trumpet.
If not cleaned regularly, this could cause serious damage to your instrument.
The buildup of this unwanted mixture could have some dire effects on your playing as well.
The Effects of Neglect
**Ignored and uncleaned trumpets** tend to lose their quality of sound.
Accumulated dirt and moisture impede the smooth airflow through the trumpet, resulting in a distorted, muffled sound.
Such hindrances might not only ruin your performance but could also make playing your instrument physically strenuous.
Furthermore, neglecting regular cleaning of the trumpet can lead to the development of greenish-blue substances on the inner walls of the instrument.
These substances are verdigris – a form of copper corrosion that can permanently damage your trumpet.
Surely, seeing your instrument damaged beyond repair because of something as preventable as verdigris is a nightmare for every trumpet player.
Apart from affecting the sound and causing physical damage, an unclean trumpet can also pose a significant health risk to the player.
Health Hazards
It may be surprising for some, but if not cleaned for a long time, the trumpet can harbor various types of bacteria and mold.
Playing a trumpet filled with harmful bacteria can lead to a variety of **health issues** ranging from allergic reactions to serious lung infections.
Maintaining a clean trumpet is not only a matter of preserving the instrument but also of preserving your health.
So, next time you decide to skip cleaning your trumpet, remember you might be exposing yourself to a multitude of health risks.
The more often you clean your trumpet, the less chance you have of contracting any sickness from it.
On the brighter side, most trumpet-related health issues are easy to avoid – all it takes is regular cleaning and maintenance.
Cleaning your trumpet is a small price to pay compared to the damages neglect can cause to your health and your beloved instrument.
Clean it regularly, and both you and your instrument will have a much better chance of performing beautifully for years to come.
The Right Tools for the Cleaning Job
When it comes to cleaning your trumpet, having the right tools at your disposal can make the process more straightforward and efficient.
Understanding the importance of these tools will help you maintain an excellent trumpet playing experience and prolong the life of your instrument.
Tools Needed for Trumpet Cleaning
A basic trumpet cleaning kit typically includes a mouthpiece brush, a valve casing brush, and a flexible bore brush.
Mouthpiece brushes are designed to clean, you guessed it, the trumpet’s mouthpiece. It’s smaller than other cleaning brushes and helps get rid of the tiny particles lodged in your mouthpiece.
The valve casing brush, which is larger than the mouthpiece brush, is used specifically for deep-cleaning the valve casings.
A flexible bore brush, also known as a snake brush, is a longer, more flexible brush meant to clean the trumpet’s tuning slides and main tubing.
“The snake brush is the most flexible and longer piece of equipment in your cleaning kit, perfect for reaching the longer parts of your trumpet.”
This tool is an indispensable part of your trumpet cleaning toolkit. It ensures that no part of your trumpet is left out while cleaning.
Cleaning Solutions and Cloth
Besides brushes, you also need cleaning solutions and a cloth to clean your trumpet.
A diluted dish soap solution is often safe and effective for cleaning brass instruments, including the trumpet. It helps disintegrate stubborn built-up dirt and grime ruining your instrument’s sound and aesthetic.
A lint-free cloth is also important to have for wiping down the trumpet after cleaning. It helps keep the body of the instrument free of fingerprints and possible smudges.
“A lint-free cloth is very instrumental in the drying and polishing process of your trumpet cleaning.”
Having a proper wiping cloth ensures your trumpet stays in perfect shape after the cleaning session is finished.

This informative video provides a visual guide to actually using these tools and cleaning your own trumpet. So, make sure you watch it to get a good grasp of the cleaning process.
Get to see the real-life applications of these tools and understand how they will be helping you maintain your trumpet in the long run.
What Happens If You Don’t Clean Your Trumpet Regularly?
When it comes to maintaining the quality and performance of your trumpet, consistent cleaning and care cannot be overstated.
Improper Sound Production
If you neglect the regular cleaning of your trumpet, you will start to notice a decrease in its sound production quality.
One of the most obvious signs of a dirty trumpet is a flat or dull sound that lacks the crisp and clear tune it is supposed to have.
A dirty trumpet tends to have clogged passages due to debris accumulation, causing the air flow to reduce and leading to an inferior sound.
Regular cleaning ensures that the air passages remain clean and unblocked, allowing for proper sound production.
Ignoring the need for cleanliness will lead to a disappointing performance, whether you’re playing in a band or practicing at home.
One of the most obvious signs of a dirty trumpet is a flat or dull sound that lacks the crisp and clear tune it is supposed to have.
This flat sound is a clear sign that your trumpet has lost its tonal quality due to lack of cleaning.
Cleaning your trumpet not only maintains its sound quality but also prolongs its life, making it a worthwhile investment of your time.
The Impact on Trumpet Components
Apart from the sound quality, ignoring regular trumpet cleaning also has a significant impact on the trumpet’s mechanical components.
Overtime, the buildup of moisture and saliva can lead to corrosion, damaging the metal parts of your trumpet.
The pistons and valve casing, for instance, can become worn out due to this corrosion.
The slide tubes, another critical component, can also become stuck if they’re not cleaned properly and regularly.
The damage to these parts can drastically affect the playability and overall functionality of your trumpet.
The pistons and valve casing, for instance, can become worn out due to this corrosion.
This is a serious issue as it not only hampers the performance of the trumpet but can also lead to costly repairs.
Regular cleaning can drastically reduce the risk of corrosion and ultimately lead to a better functioning trumpet.
Impact on Health
Perhaps a less obvious but equally vital consideration when avoiding regular trumpet cleaning is your health.
A dirty trumpet is a favourable environment for various types of bacteria and mould to grow.
These microorganisms can cause different respiratory or oral health issues, especially when released into the air while playing the instrument.
Ensuring your instrument’s cleanliness isn’t merely a matter of performance; it’s crucial to maintaining your health as a trumpet player.
Ignoring this can expose you to unnecessary health risks in the long run.
A dirty trumpet is a favourable environment for various types of bacteria and mould to grow.
These bacteria are harmful, can grow rapidly in unclean conditions, and pose serious health risks.
Regular thorough cleaning of your trumpet can eliminate these risks, making it safer for you and others around you.
Conclusion
In summary, neglecting regular trumpet cleaning can lead to many undesirable effects, ranging from poor performance and costly repairs to serious health concerns.
When playing the trumpet, it’s not merely about playing the right notes, but maintaining the instrument is just as important.
Remember, a clean trumpet is not just a better-performing instrument, it’s also a healthier one.
Instructions for Disassembling Your Trumpet
Disassembling your trumpet correctly is paramount to ensure the utmost care to all parts while permitting an effective clean.
Understanding Your Trumpet’s Parts
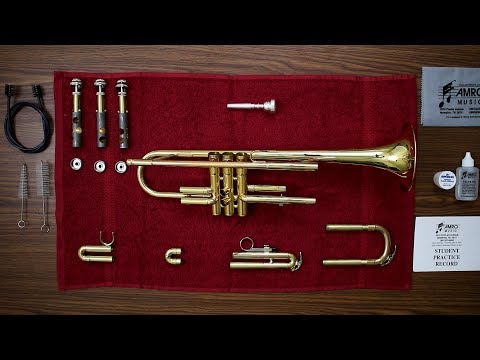
Firstly, it is crucial to recognize the basic parts of your trumpet.
These comprise of the mouthpiece, the three valve casings, the three slides (1st, 2nd, 3rd), the main tuning slide, bottom valve caps, top valve caps, and the finger buttons.
Each of these parts has its own function, hence their significance during the cleaning process.
A comprehensive understanding of your trumpet’s parts not only eases disassembly but guarantees safety for every part.
This is because you will handle each part with the attention it commands, preventing potential damage.
Damage is likely when you are unfamiliar with how each part should be detached and treated.
Start Disassembling
First, remove the mouthpiece from its place by giving it a gentle twist.
Next, carefully and slowly unscrew the top valve caps and delicately pull out each valve, making a note of the order in which they were originally placed for reassembly.
Ensure not to force or rush any part during this process; patience and care preserve the longevity of your instrument.
Disassembling your trumpet with ample diligence guarantees excellent end results, besides saving from potential damages.
It’s crucial not to confuse the valve order as it can lead to the poor performance of your instrument.
After the valves, remove the tuning and valve slides by gently pulling.
Possible Hurdles
Sometimes, some parts, like the slides or the mouthpiece, may be stuck due to various reasons, such as gunked-up dirt.
If you encounter such a situation, do not force them out, instead, consider seeking help from a professional to avoid unnecessary damage.

After reading this article, it could be beneficial for you to also watch a video demonstration.
By doing so, you’ll be guided step-by-step through the whole process, achieving a clear understanding of how to disassemble, clean, and reassemble your trumpet correctly.
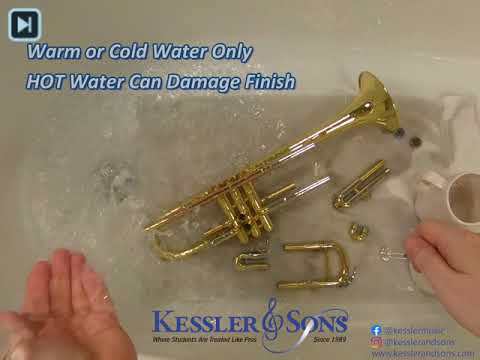
How to Properly Soak and Clean Trumpet Parts
Before delving deep into the soaking and cleaning process, an essential step is disassembling the trumpet.Once your trumpet is disassembled, and you have carefully put aside all the parts, you’re ready to begin soaking them.
The soaking process
Start by filling a large container or basin with warm water; make sure it is big enough to accommodate all trumpet parts without crowding them.
Adding a mild dish detergent into the water is recommended. Make sure the soap is completely dissolved before placing your parts into the solution.
Use a soft cloth to swab the interior of the trumpet valves and tubing before you submerge them.
Soak your trumpet parts for approximately 15 minutes – a process that helps loosen any build-up on your instrument.
Frequent soaking of your trumpet parts plays a crucial role in maintaining your instrument’s ‘newness’.
The key here isn’t to let trumpet parts sit in the solution for extended periods, but to use the soaking process as a way to gently loosen grime and dirt.
This point cannot be overemphasized. You must be careful not to leave the brass parts in the soapy water for too long, as they can become discolored. Instead, use the foamy solution to wipe, rinse, and get rid of the grime accumulated over time.
Cleaning after soaking
After soaking, the next stage is cleaning. One by one, take out the trumpet parts from your soapy water solution.
Use a non-abrasive brush (preferably nylon) to scrub all parts gently. The brush bristles should be soft enough not to scratch the brass surface.
Brush gently but ensuring to reach all areas and corners of the trumpet parts where dirt might be hiding.
In places where the brush can’t reach, for instance, the small tubing or valve cases, use a specialized trumpet snake. With its bendable form and soft bristles, the snake is able to reach the nooks and crannies the brush couldn’t.
Upon completion of the cleaning process, thoroughly rinse the trumpet parts with warm running water. This ensures that no soap residue is left behind.
Drying the pieces
After rinsing, your trumpet parts need sufficient time to dry. One effective way is using a clean, lint-free towel to blot the parts dry.
For those hard-to-reach parts, you can use a hairdryer set on low heat.
Just remember to hold the dryer a good distance away to prevent heat damage.
Another method is air-drying. Place the parts on a clean, dry towel and let them air-dry naturally. However, you must ensure the parts are thoroughly dry to prevent the potential for brass tarnish.
Taking the time to properly soak, clean and dry your trumpet pieces not only benefits the performance of the instrument, but also helps in extending its lifespan.
Is It Safe to Use Regular Dish Soap for Trumpet Cleaning?
Many trumpet players often wonder if an ordinary dish soap can be used for maintaining the good condition of their instruments.
The short answer to this question is yes. However, a few factors should be considered when making this decision.
Dish soap properties to consider
Firstly, the harsh chemicals in some dish soaps may be harmful to the instrument’s brass finish.
Nevertheless, there are mild dish soaps that will do no harm to the instrument while effectively helping to loosen grime and oils on your trumpet.
It is also important to ensure the dish soap does not contain strongly scented perfumes, as these can leave residues that may affect the trumpet’s performance.
Mild dish soaps can be useful in maintaining your trumpet’s cleanliness while causing no harm to the instrument.
A mild soap generally means one that is free from harsh chemicals and strong fragrances.
These soaps are gentler on the trumpet’s brass, preserving its shine and longevity.
Dos and Don’ts when using dish soap for trumpet cleaning
Always rinse thoroughly after cleaning your trumpet with dish soap.
Failing to do this might leave soapy residues on your trumpet, which can hasten tarnishing and possibly interfere with the instrument’s operation.
Never let your trumpet sit in soapy water for an extended period; a few minutes should be enough to loosen dirt.
Rinse thoroughly after using dish soap and don’t leave your instrument soaking to avoid leftover residues and potential damage.
Additionally, make sure that the soap is completely rinsed off after cleaning to avoid any residue or buildup.
Nevertheless, despite all these cautions, many musicians find that dish soap offers a convenient and effective way to keep their trumpets clean.
After reading through this, it would be beneficial to watch the linked video.
It offers visual aid for a better understanding of the cleaning process, as well as practical tips on ensuring the longevity of your trumpet.
Tips for Reassembling Your Trumpet
After the thorough cleaning of your trumpet, the next integral stage involves reassembly. Knowing how to correctly put your instrument back together is just as important as knowing how to take it apart.
Therefore, the reassembly process requires not just knowledge which you’ll get from this guide, but also patience and careful attention.
Understanding Your Trumpet’s Parts
Firstly, it is essential to identify and familiarize yourself with the pieces of your trumpet. A standard trumpet consists of the mouthpiece, leadpipe, tuning slide, valve slides, valves, the bell, and caps.
Often, parts are easily understandable. However, the valves can be confusing as they are nearly identical but vary in size slightly. Note that the first valve is the largest, the second is the smallest, and the third is medium-sized.
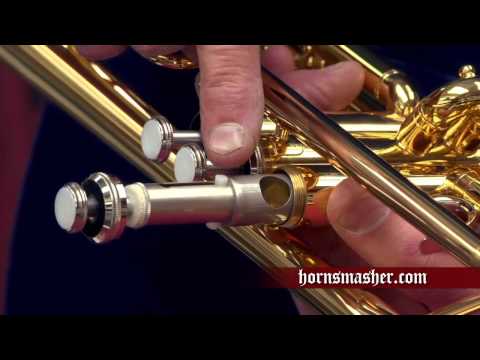
Reassembling the Valves
Start the reassembly process by placing the valves back in their respective casing. While inserting the valves, you must rotate them gently to find their correct position. Once correctly inserted, they should easily drop in and move up and down smoothly.
You need to ensure that the guide on each valve lines up with the guide slot in the casing. Once aligned, tighten the valve cap – not too tightly, just enough to secure the valve. You do not want to risk damaging your instrument with overtightening.
Remember, the valves must not be forced into the casings or tightened excessively; this could damage the trumpet’s delicate mechanics.
This quote emphasizes the need for caution and respect for the delicate nature of your instrument during the reassembling process. Forcing the valves or overtightening them can lead to unnecessary repair costs or even ruin the sound quality of your trumpet.
Attaching the Slides
After the valves, the valve slides are next. Each slide corresponds to a specific valve, with the first, second, and third valve slides being differentiable by size and shape.
Ensure each slide is well lubricated with slide grease before insertion. In case of resistance, do not force the slide into its tube. Instead, try to gently twist it as you apply even pressure.
Inserting the Mouthpiece
Lastly, place the mouthpiece on the lead pipe. Some players prefer to twist it slightly as they insert it, but this is entirely optional. It is, however, important not to push or screw the mouthpiece too tight, as it can become stuck, making it challenging to remove next time.
The final step of reassembling your trumpet is placing the mouthpiece; however, it’s crucial to avoid pushing or screwing it too tight
Trusting the trumpet’s manufacturing precision would allow for a snug fit of the mouthpiece on the lead pipe without too much force. Also, remember – the focus is not just on assembling your trumpet but on doing so in a way that ensures its long-term wellbeing and optimal performance.
Accompanied by patience and a gentle touch, these reassembly tips will ensure your trumpet is ready for its next performance. Moreover, correct reassembly affects both the lifespan of your instrument and its sound quality. Therefore, pay equal attention to reassembling as you would while cleaning or playing it.
The Right Way to Oil Trumpet Valves and Slides
Caring for any musical instrument is crucial, but particular care must be taken when dealing with wind instruments like the trumpet.
Proper lubrication of the instruments’ moving parts is a key aspect of this maintenance, particularly for the trumpet’s valves and slides.
While this might appear simple, the application of valve oil and slide grease requires a certain level of precision to ensure smooth operation and prolong the instrument’s lifespan.
The following guidelines will provide you with a step-by-step process on how to properly oil your trumpet’s valves and slides.
Recognizing The Right Time for Oiling
It is vital to be aware of when your trumpet valves and slides require oiling or greasing.
A trumpet’s valves tend to feel sluggish or sticky when they are in need of lubrication.
If you start to notice that your slides are hard to move, it’s a good indicator that they are in need of greasing.
It’s recommended to oil your valves every time you play, and to apply grease to the slides as needed.
This not only helps in maintaining smooth instrument operation, but also in guarding against any potential damage resulting from friction.
Understanding the signs of when your trumpet needs lubrication goes a long way in keeping it in top condition.
Proper Oiling Technique
Picking the correct oiling technique is just as important as knowing when to oil.
Before you start, ensure your hands are clean and free of any disruptive substances that may affect the trumpet’s operation.
Remove the valve from the casing slowly and carefully, making sure to remember its appropriate sequence for easy reassembly.
Apply a few drops of valve oil to the valve itself, ensuring to spread it evenly around the valve.
Once oiled, replace the valve back into their casing gently, ensuring to rotate it until it locks into place.
Greasing the Slides
When it comes to slide greasing, the first step is to remove the slide from the trumpet.
Take a small dab of slide grease and apply it to the inner slide tubes using your fingers.
Make sure that it is spread evenly across the slides’ surface for effective lubrication.
After greasing, carefully reinsert the slide back into its original position on the trumpet.
The key is to be consistent and mindful of the amount of pressure you exert while working with your instrument.
Excessive force during this process may damage the trumpet’s delicate parts, affecting its sound output and overall efficiency.
In the embedded video, we see a detailed demonstration of how to properly apply oil and grease to your trumpet’s valves and slides.
This visual guide will further assist in your understanding and implementation of these vital maintenance steps for your instrument.
Buffing the Exterior: The Finishing Touch to Trumpet Care
The Importance of Buffing
Always remember, buffing makes an incredible difference in the appearance of your trumpet.
Buffing the exterior is not simply about improving the instrument’s aesthetic appeal.
More importantly, it plays a paramount role in preserving the trumpet’s value, functionality, and longevity.
If neglected, minute scratches and smudges can accumulate over time, affecting both the sound quality and visual aspects of the instrument.
Most experienced trumpet players consider regular buffing of their instrument paramount to its upkeep and overall player experience.
A well-buffed trumpet is not only visually attractive but also resonates with superior, crisp sound quality.
This is because any foreign particles or minor damages on the trumpet’s surface can compromise the vibrations needed for perfect sound production.
Simply put, the cleaner your trumpet’s exterior is, the better its sound quality will be.
The Buffing Process
Buffing is not an overly complicated process.
However, it is imperative to approach it with delicacy and patience to prevent potential damages to your instrument.
To start, always ensure your hands are clean, grease-free, and dry before handling your instrument.
Then, using a soft, dry, lint-free microfiber cloth, gently wipe down your trumpet on every surface.
Always use soft, circular motions when buffing your trumpet to avoid causing any scratches.
This is a tried-and-true technique that enhances your trumpet’s shine without causing any surface damages.
Furthermore, it effectively picks up and removes any dust, grime, or fingerprint marks that may have settled on your trumpet’s finish.
Using a Proper Polishing Agent
When it comes to choosing a polishing agent, it is vital to select a product specifically designed for your trumpet’s material.
For instance, if your trumpet is crafted from brass, a brass polish would be the most suitable.
A silicone-free polish is the preferred choice as it won’t leave any residue that could potentially harm your trumpet’s finish.
Always ensure to read the manufacturer’s instructions fine print to verify that the polish is safe to use on your specific trumpet’s material.
These polishing agents are typically easy to apply, and they do a great job of restoring your instrument’s lustre.
The Frequency of Buffing
There is no fixed rule in the frequency of buffing your trumpet.
However, most professional players recommend doing it after every use or at least once a week depending upon how often you play.
This frequency not only keeps your trumpet looking top-notch all the time, but it also helps you catch any potential structural issues earlier on.
Buffing your trumpet regularly prevents sweat, grime, and oils from building up on the trumpet’s exterior.
These deposits can corrode the metal over time and will ruin the finish if they’re not removed promptly.
With these tips in mind, remember to inspect your trumpet regularly, keep it regularly cleaned, well-oiled, and shiny.
The Bottom Line
Maintaining your trumpet through regular cleaning not only extends its lifespan, but also ensures optimal playing performance.
Having a clear understanding of the proper disassembly, cleaning, and reassembly procedures can prevent potential damage to your instrument.
With the right tools in your cleaning kit, you can tackle every nook and cranny effectively.
Remember, neglecting regular cleaning can lead to build-up of oil, grease and other residues that can negatively impact the quality of sound.
Dish soap can serve as a safe cleaning agent, followed by proper oiling of valves and slides.
The final step of buffing the exterior adds an aesthetic touch, providing a shining, polished look to your trumpet.
These points reinforce the importance of regular care and highlights how the right methods can lead to a long-lasting and quality sounding instrument.